Authorization Code Grant Type
Each request is accompanied by an access token to ensure validity of the request. Requests may be executed in the context of any standard product user.
For prerequisites to use OAuth 2.0 Authentication, see REST API section in the administration manual.
To ensure that credentials and tokens are protected at all times, use HTTPS with OAuth 2.0.
Authorization Code
Before you are able fetch a token, you first need an authorization code. You can request one by calling the "authorize" endpoint in the oauth2 servlet. Let's have a look at an example request for a confidential client:
Example Request Confidential Client
https://localhost:8000/ADOXX/oauth2/authorize?client_id=testapplication&response_type=code&state=4711
As public clients do not use the client secret, they need to use an alternative verification mechanism, in this case: PKCE (Proof Key for Code Exchange). That means, public clients need to specify the following additional parameters in the authorization code request:
- code_challenge An encoded string: code verifier encoded with a certain encryption method (see below).
- code_challenge_method ( plain | S256 ) The encryption method to use. S256 MUST be used if the client supports this method.
These will be stored along with the authorization code and will be included in subsequent tokens so they can be used for calculating and verifying the passed code_verifier in the token requests.
The state attribute is an additional security mechanism to counter CSRF (Cross Site Request Forgery) and must be specified. The value can be any value which is then simply passed through. If this passed state is not contained in the final response, the client must disregard the response.
Example Request Public Client
https://localhost:8000/ADOXX/oauth2/authorize?client_id=testapplication&response_type=code&state=4711&code_challenge=E9Melhoa2OwvFrEMTJguCHaoeK1t8URWbuGJSstw-cM&code_challenge_method=S256
See https://tools.ietf.org/html/rfc7636#section-4.1 for details.
Redirects are performed in the course of the authorization code request and you will need to interact with the UI.
After submitting the request, you will be forwarded to authenticate in the ADOXX-based product using the authentication mechanisms set up in the installation (Standard, IDM or SAML).
In case of the Standard connector, you will be confronted with the usual login page where you now need to authenticate your user. This user will be the one that is logged in later when accessing the tool via OAuth 2.0.
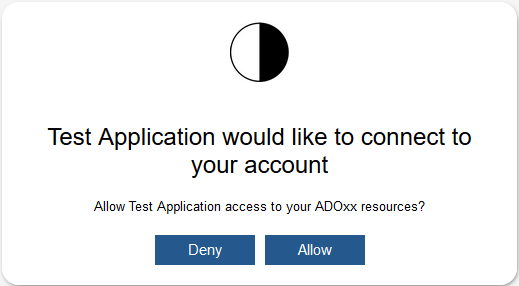
After successful authentication, you will be redirected to the authorization grant screen where you are asked to allow access for the requesting client (application) to the ADOXX-based product in your name:

If you allow this, an authorization code will be created and will be returned via request parameter when redirecting to the redirect endpoint specified in the client configuration:
RESPONSE
https://localhost:8000/ADOXX/redirect?code=RIOFDiYSJ_QPRhG_V_ZpBuwPB0OX-gWWEDELNdf1Qbc&state=4711
Access Token
In order to create an access token, you need to perform a POST request to the token endpoint in the oauth2 servlet.
REQUEST
https://localhost:8000/ADOXX/oauth2/token?grant_type=authorization_code&code=RIOFDiYSJ_QPRhG_V_ZpBuwPB0OX-gWWEDELNdf1Qbc
Via parameters you will need to pass the grant information that
authorizes you to request that token. The grant information consists of
the grant type and the value. In the above request, we are creating an
access token based on an authorization code. Therefore the grant type is
authorization_code and the value (authorization code generated
in the last step) is passed in the parameter code.
- Client authentication for confidential clients: Additionally, this request must contain an authorization header (Basic authentication) where the user name is the client ID and the password is the client secret (plain).
- Client authentication for public clients: As public clients do
not use the client secret, they simply pass the client ID via
parameter. Additionally, they need to pass the code verifier
corresponding to the non-encrypted value resulting in the
code_challenge from the PKCE information passed in the previous step
(authorization code) when encrypted with the specified method. That
means code_challenge = code_challenge_method(code_verifier). For
example:
https://localhost:8000/ADOXX/oauth2/token?grant_type=authorization_code&code=RIOFDiYSJ_QPRhG_V_ZpBuwPB0OX-gWWEDELNdf1Qbc&client_id=testapplication&code_verifier=dBjftJeZ4CVP-mB92K27uhbUJU1p1r_wW1gFWFOEjXk
The result of this request will be a JSON response of the following form:
RESPONSE
{
  "access_token": "3Ow3o27zWh24q37P4mHQtGf6b-fCraSJj3G34vrt5AM",
  "token_type": "bearer",
  "expires_in": 1799,
  "refresh_token": "SVdQLDjEYfPrHv79KgRqSSAyE_-3b4SEcHlM1Og5KD4"
}
It contains the generated access token (type bearer), the time in seconds how long the token will still be valid and a refresh token, which can be used to generate the next access token.
In case of an error (invalid input, expired grant etc.), the
response will contain the headers error and error_description with useful information concerning the reason of
the failure.
Refresh Token
Refreshing tokens is very similar to the previous step of creating an access token based on an authorization code. The difference is only, that we are passing a different grant (refresh token instead of authorization code).
REQUEST
https://localhost:8000/ADOXX/oauth2/token?grant_type=refresh_token&refresh_token=SVdQLDjEYfPrHv79KgRqSSAyE_-3b4SEcHlM1Og5KD4
All the rest (client registration, PKCE, error handling etc.) are the same.
Token Usage
Having a valid access token, you can access information from the ADOXX-based product.
When performing the REST call, you need to add an authorization header of the type of the returned token (e.g. "bearer") passing the access token as value. The REST component will verify the code and log in the corresponding user if successfully verified.
Example Generation and Setting of the Authorization Header (Java):
String sPath = "https://<SERVER_NAME>:<PORT>/<PRODUCT><VERSION>/rest/myEndpoint";

String sAccessToken = "some_token_received";

HttpGet aMethod = new HttpGet (sPath);

aMethod.addHeader ("Authorization", "Bearer " + sAccessToken);